 |
| |
Electric Firework Ignition. |
|
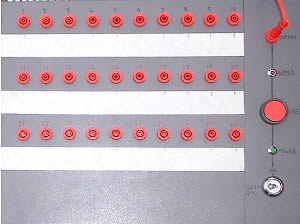
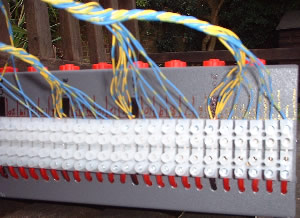
Overview I have been wanting to set off my garden firework electrically for a few years now... On the 6th of November 2004 I finally put my mad plan into action! Normally garden fireworks are set of by lighting the fuse with a flame (as you all know) but me being electronically minded wanted a better and more controlled way of doing it, so I designed and made the 30 channel control box pictured right to ignite my rockets. |
The 30 channel control box. |
|
|
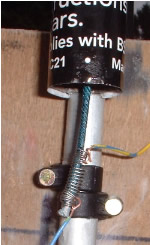
Principle The basic principle is to wrap a thin wire around the firework fuse, then apply a voltage so the wire gets hot thus setting light to the fuse. I found that the fuse fitted nicely inside a spring and the wire got hot and did not melt apart to quickly, I used a 6 volt 4Ah SLA battery to make the wire get hot, that was fitted inside my control box and connected to my simple circuit. <<< The rocket fuse with the coil of wire around it ie the Fuse wire! |
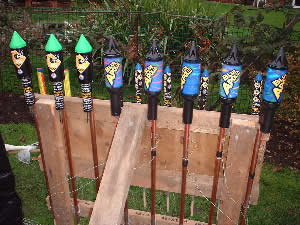
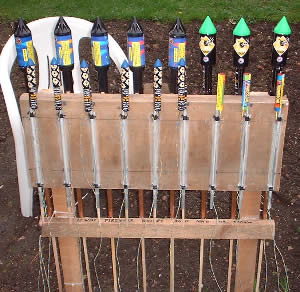
| Racked up! This is the firework rack I made from tubing and a few bits of timber, this rack can hold 17 rockets. (8 large and 9 small)
8
large rockets loaded in tubes, |
9
small rockets loaded on this side |
|
Back view of the control box showing the wiring, on the other end of the blue and yellow wires are the rockets! (they were located about 8 meters away) |
So...Did it work? In total I had 26 rockets (In the rack above and another 5 way rack plus 4 standing in single tubes) added to this I had 2 katherin wheels wired back to my control box, using a total of 28 circuits..... To answer the question...Yes it worked and better than I expected although 3 rockets didn't ignite but that was due to damp fuses and the large katherin wheel didn't ignite either, I think that was because it was the last channel to fire and the battery was a bit exhausted by then. |
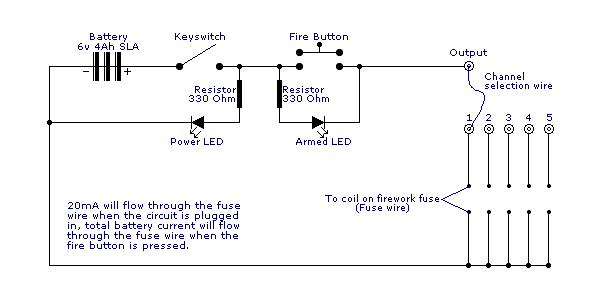
Control box Info My control box is simple to operate and the circuit is easy to understand. Operation:- 1)Turn
the key switch to the on position (green
power LED will light) This is assuming you have wired your circuits to the connectors on the back of the box in the respective channels 1 to 30. Circuit description:- One end of the fuse wire is connected to the negative terminal of the battery, the other end of the fuse wire is connected to the positive terminal of the battery but via a fire button and key switch. When the key switch is in the on position and fire button is pressed total battery current flows through the fuse wire, thus making it get hot and setting light to the firework fuse....kaboom! Please have a look at the circuit diagram below, you can add as many circuits as you want i've only drawn 5 in the example below, i've also added a power LED and an armed LED.
Note:- If you change the battery to a higher voltage (i.e. 12v) then you will need to change the value of the resistors to ensure only 20mA flows, the 20mA is to light the armed LED to show there is a completed circuit, any more than 20mA and you could warm up the fuse wire and set off the firework prematurely!!) |
DISCLAIMER OF LIABILITY: www.davidavery.co.uk has posted this page as guidance only, not as an absolute fact on how to build a firework detonating box. If you proceed to use the diagram or any variation of it, www.davidavery.co.uk will not be held liable at any time, under any circumstance, for damages of any kind, or injuries resulting from improper practices, materials, tools, or lack of knowledge and skill. Further www.davidavery.co.uk assumes no legal liability or responsibility for the use or misuse of the information contained on this page. |
|
|
|
© David Avery 2004-07 |